Automatic Blinds Motor instructions

Removing the Roller Blind

In this guide we will show you common methods of removing a roller blind from its brackets. This is a general reference as it is impossible to cover all the different mechanisms out there. However, you should be able to use this information to figure out how to work with your blinds.

Watch the video

Terminology​

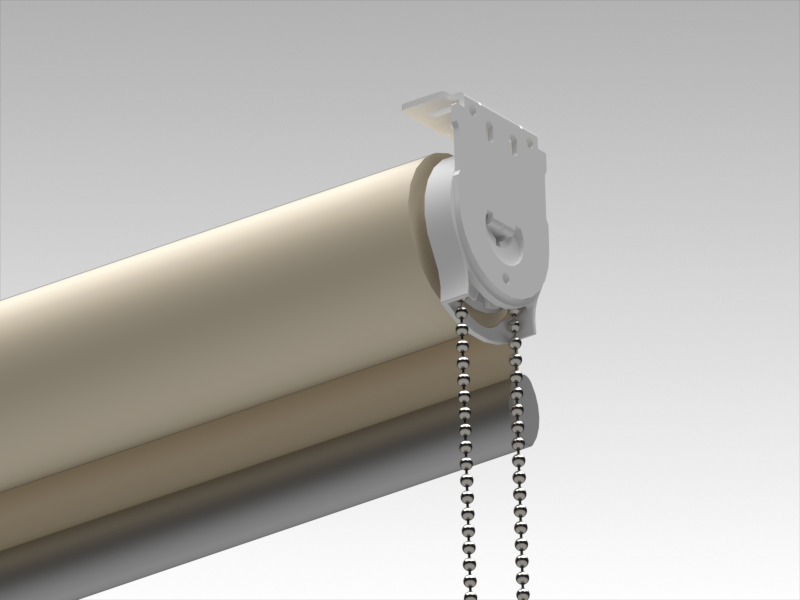
When removing the blinds, it is useful to talk about the two ends. We call the end with the chain winder the drive end, while the idle end is on the opposite side.

Preparation​

Before starting to remove the blind, please roll it all the way up to make it easier to handle once loose. Also, a flathead screwdriver might come in handy in some scenarios.

Two types of roller blinds​

For our purposes, we can define two main types of roller blind mechanisms by how the chain winder attaches to its bracket. The method for removing the blinds differ accordingly.

Slot type Hook Type
"Slot Type Mech" "Hook Type Mech"

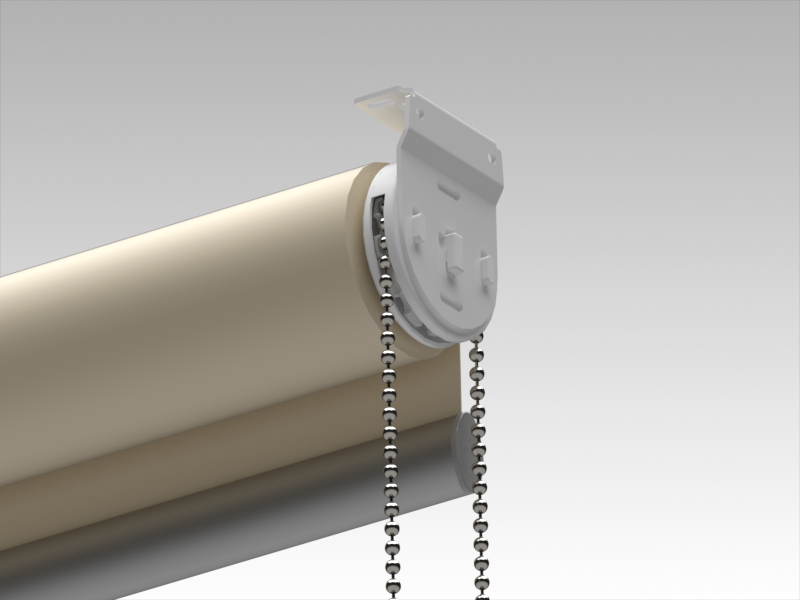
For blinds with a slot type attachment​

Blinds with a slot type attachment have a slot on the chain winder that connects with a tab on the drive end bracket. To remove blinds of this type:

  1. Release blind from idle end by rotating the swivel plate to retract the pin
  2. Pull the blind away from the drive end bracket to remove it
 Tip

The swivel plate should be rotated in an anticlockwise direction when facing towards the blind. Sometimes the swivel plate can be difficult to reach with your fingers. In that case, you can use a flathead screwdriver to rotate it.

 Be careful

Once the pin on the idle end is retracted, the blind will come loose at this end. Make sure you are already holding the blind with one hand so that it does not fall off.

For blinds with a hook type attachment​

Blinds with a hook type attachment have one or more hooks that catches onto corresponding holes on the drive end bracket. There are two ways in which blinds of this type can be removed:

Method 1​

  1. Lift the drive end of the blind up slightly to unhook it.
  2. Push blind towards the idle end bracket to release one end of the blind.
  3. Pull the blind away from the idle end bracket to remove it.
 Tip

Sometimes the blind is installed a bit too tightly which can make it hard to release from the drive end bracket. In this case, you can use a flathead screwdriver to pry the chain winder away from the bracket after it has been unhooked.

Method 2​

  1. Release the idle end by using a flathead screwdriver to retract the spring loaded pin from the idle end bracket.
  2. Slightly lift the chain winder to unhook it from its bracket, then pull the blind away to remove it.
 Tip

For recess fit blinds, a flathead screwdriver will be needed in order to retract the pin from the bracket.

Installing the Motor

In this guide we will show you how to install the Dendo motor into your roller blind.

Watch the video​

Terminology​

Throughout this guide, we will be referring to some specific components. They are:

  • Bracket adapter
  • Tube drive adapter
  • Tube crown adapter

The bracket adapter is what attaches the motor to the drive bracket of your blind. It is ordered together with the motor. Depending on the type of blind you have, a bracket adapter might not be needed.

The tube drive adapter and the tube crown adapter come as a set and are also ordered with the motor. They are intended to allow the motor to fit into the blind tube and transmit torque. For brevity, from hereon in we will refer to them as the drive adapter and crown adapter respectively.

 Reference

Please refer to System Compatibility for more information about which types of bracket and tube adapters is required for you specific blind.

Preparation​

The blind must first be removed from its brackets before the motor can be installed into it. If you are unsure on how to remove the blind, please see Removing the Roller Blind. Additionally, you will also need to remove any child safety device that might be installed.

If you ordered the motor with a bracket adapter, you will need a small Phillips head screwdriver to install it. Also, a flathead screwdriver might be needed to help pry the chain winder out of the blind.

Steps​

Install the adapters​

  1. Install the bracket adapter (if applicable) with the included screws.
  2. Slide on the crown adapter, ensuring that the flange is towards the back.
  3. Install the drive adapter, using some force initially to push it onto the motor's drive shaft.
 Important

If the bracket adapter is for a hook type attachment, please ensure that the hooks are pointing downwards.

Insert the motor into the blind​

  1. Remove the chain winder from the blind by pulling it out.
  2. Align the drive adapter with the internal ribs of the blind tube.
  3. Slide motor into the tube, stopping with roughly 1/3 remaining.
  4. Align the crown adapter with the blind tube and insert it into the tube.
  5. Slide in the rest of the motor.
 Important

There might be multiple angles for the drive and crown adapters to fit into the blind tube. In such cases, always choose the angle with the least amount of play to ensure optimal performance.

Install blind back onto the bracket​

To install the blind back onto the brackets, simply use the same process as removing the blind but in reverse order. Please ensure that the charging port on the motor is facing downwards and accessible.

 Bracket position adjustment

After replacing the chain winder with the Dendo motor, the overall width of the blind will have changed slightly. In most cases, the blind hardware system is designed to allow minor size variations like this. However, in some cases if the brackets become too loose or too tight, it might be necessary to adjust the bracket positions. A few millimetres is usually all that's required.

Pair to remote/controller​

  1. Press and hold the pairing key on the motor until the green status LED lights up (shown below).
  2. Follow the pairing instructions for the controller you are using.

 Tip

You don't have to wait until the blind is fully installed before performing the pairing process. Depending on your project, it might be easier to pair the motor first before reinstalling the blind.


 Limited time window for pairing

Once the motor is in pairing mode (green status LED on), there is a 60 second time window in which to complete the pairing process. If nothing happens in this timeframe, the motor will automatically exit pairing mode.

RZ Series Programming Instructions

I/O Summary


LED States

LED behaviour

Meaning

Solid green

Motor is in RF pairing mode

Green blink * 2

A command was received / wake up from deep sleep

Red blink * 2

Error

Red blink while moving

Battery is low

Amber blink * 2

Enter deep sleep mode

Deep sleep mode

The motor has a deep sleep mode to minimise battery consumption and prevent accidental activation during transportation or storage. Motors are always shipped with deep sleep mode activated.

Wake up from deep sleep mode

When motor is in deep sleep mode, hold down the PROG button until the status LED blinks green 2 times. Motor is now in active mode.

Enter deep sleep mode

When motor is in active mode, hold down the PROG button until the status LED blinks amber 2 times. Motor is now in deep sleep mode.

Onboard Control Method

Limit setting

Follow these steps to set limits using the onboard controls:

  1. Press and hold the PROG
  2. While holding the PROG button, pull and hold the pull
  3. After 3 seconds, the motor will jog indicating it has entered limit setting
  4. Using the pull switch, position the roller shade to the desired lower limit. Note that in the current mode, the motor will only run when the pull switch is being pulled The motor will stop upon release. The next time the pull switch is activated, the motor will run in the opposite direction.
  5. Press the PROG button to save the current position as the lower
  6. Using the pull switch, position the roller shade to the desired upper limit.
  7. Press the PROG button to save the current position as the upper
  8. Limit setting is now

Setting a favourite position

 Important

Must be completed after limit setting.

Follow these steps to set the favourite position using onboard controls:

  1. Pull and hold the pull
  2. While holding the pull switch, press and hold the PROG
  3. After 3 seconds, the motor will jog indicating it has entered favourite position setting
  4. Using the pull switch, position the roller shade to the desired favourite position. Note that in the current mode, the motor will only run when the pull switch is being pulled down. The motor will stop upon release. The next time the pull switch is activated, the motor will run in the opposite
  5. Press the PROG button to save the current position as the favourite
  6. Favourite position setting is now complete

Normal operation

Pulling the pull switch once will send the motor towards either the upper or lower limit position. The direction alternates each time the motor is activated by the pull switch. To stop the motor, simply pull the pull switch while the motor is running.

To position the roller shade to the favourite position, pull and hold the pull switch for 3 seconds, upon which the motor will then move the roller shade to the favourite position.

Installing the Solar Panel

The Dendo solar panel is a useful accessory that can extend the time interval between recharging the motor. In some cases it could even eliminate the need to recharge the motor altogether.

Preparation​

Select a location on the window pane where the solar panel is to be attached and clean the area of any dust. This will ensure the adhesive strip works as intended.

A flathead screwdriver is needed to release the motor I/O cover.

Steps​

  1. Plug solar panel cable into the solar panel.
  2. Remove the backing from the adhesive strip on the solar panel and stick the solar panel to the cleaned area of the window pane.
  3. Use a flathead screwdriver to pry the I/O cover off the bottom of the motor.
  4. Pull out the solar panel reciprocal connector from inside the motor head.
  5. Put the I/O cover back onto the motor.
  6. Plug the solar panel cable into the reciprocal connector.
  7. Use the included cable clips to tidy up the cable.
 Important

Take care to install the solar panel at a location that is close enough for the cable can reach the motor.


 Two cable exits

The solar panel reciprocal connector can exit the motor head on either side. Choose the one that works best for your installation.


 Tip

For recess fit blinds, a flathead screwdriver will be needed in order to retract the pin from the bracket.

Installing the Motor

In this guide we will show you how to install the Dendo motor into your roller blind.

Watch the video​

Terminology​

Throughout this guide, we will be referring to some specific components. They are:

  • Bracket adapter
  • Tube drive adapter
  • Tube crown adapter

The bracket adapter is what attaches the motor to the drive bracket of your blind. It is ordered together with the motor. Depending on the type of blind you have, a bracket adapter might not be needed.

The tube drive adapter and the tube crown adapter come as a set and are also ordered with the motor. They are intended to allow the motor to fit into the blind tube and transmit torque. For brevity, from hereon in we will refer to them as the drive adapter and crown adapter respectively.

 Reference

Please refer to System Compatibility for more information about which types of bracket and tube adapters is required for you specific blind.

Preparation​

The blind must first be removed from its brackets before the motor can be installed into it. If you are unsure on how to remove the blind, please see Removing the Roller Blind. Additionally, you will also need to remove any child safety device that might be installed.

If you ordered the motor with a bracket adapter, you will need a small Phillips head screwdriver to install it. Also, a flathead screwdriver might be needed to help pry the chain winder out of the blind.

Steps​

Install the adapters​

  1. Install the bracket adapter (if applicable) with the included screws.
  2. Slide on the crown adapter, ensuring that the flange is towards the back.
  3. Install the drive adapter, using some force initially to push it onto the motor's drive shaft.
 Important

If the bracket adapter is for a hook type attachment, please ensure that the hooks are pointing downwards.

Insert the motor into the blind​

  1. Remove the chain winder from the blind by pulling it out.
  2. Align the drive adapter with the internal ribs of the blind tube.
  3. Slide motor into the tube, stopping with roughly 1/3 remaining.
  4. Align the crown adapter with the blind tube and insert it into the tube.
  5. Slide in the rest of the motor.
 Important

There might be multiple angles for the drive and crown adapters to fit into the blind tube. In such cases, always choose the angle with the least amount of play to ensure optimal performance.

Install blind back onto the bracket​

To install the blind back onto the brackets, simply use the same process as removing the blind but in reverse order. Please ensure that the charging port on the motor is facing downwards and accessible.

 Bracket position adjustment

After replacing the chain winder with the Dendo motor, the overall width of the blind will have changed slightly. In most cases, the blind hardware system is designed to allow minor size variations like this. However, in some cases if the brackets become too loose or too tight, it might be necessary to adjust the bracket positions. A few millimetres is usually all that's required.

Pair to remote/controller​

  1. Press and hold the pairing key on the motor until the green status LED lights up (shown below).
  2. Follow the pairing instructions for the controller you are using.


 Tip

You don't have to wait until the blind is fully installed before performing the pairing process. Depending on your project, it might be easier to pair the motor first before reinstalling the blind.


 Limited time window for pairing

Once the motor is in pairing mode (green status LED on), there is a 60 second time window in which to complete the pairing process. If nothing happens in this timeframe, the motor will automatically exit pairing mode.

RZ Series Programming Instructions

I/O Summary


LED States

LED behaviour

Meaning

Solid green

Motor is in RF pairing mode

Green blink * 2

A command was received / wake up from deep sleep

Red blink * 2

Error

Red blink while moving

Battery is low

Amber blink * 2

Enter deep sleep mode

Deep sleep mode

The motor has a deep sleep mode to minimise battery consumption and prevent accidental activation during transportation or storage. Motors are always shipped with deep sleep mode activated.

Wake up from deep sleep mode

When motor is in deep sleep mode, hold down the PROG button until the status LED blinks green 2 times. Motor is now in active mode.

Enter deep sleep mode

When motor is in active mode, hold down the PROG button until the status LED blinks amber 2 times. Motor is now in deep sleep mode.

Onboard Control Method

Limit setting

Follow these steps to set limits using the onboard controls:

  1. Press and hold the PROG
  2. While holding the PROG button, pull and hold the pull
  3. After 3 seconds, the motor will jog indicating it has entered limit setting
  4. Using the pull switch, position the roller shade to the desired lower limit. Note that in the current mode, the motor will only run when the pull switch is being pulled The motor will stop upon release. The next time the pull switch is activated, the motor will run in the opposite direction.
  5. Press the PROG button to save the current position as the lower
  6. Using the pull switch, position the roller shade to the desired upper limit.
  7. Press the PROG button to save the current position as the upper
  8. Limit setting is now

Setting a favourite position

 Important

Must be completed after limit setting.

Follow these steps to set the favourite position using onboard controls:

  1. Pull and hold the pull
  2. While holding the pull switch, press and hold the PROG
  3. After 3 seconds, the motor will jog indicating it has entered favourite position setting
  4. Using the pull switch, position the roller shade to the desired favourite position. Note that in the current mode, the motor will only run when the pull switch is being pulled down. The motor will stop upon release. The next time the pull switch is activated, the motor will run in the opposite
  5. Press the PROG button to save the current position as the favourite
  6. Favourite position setting is now complete

Normal operation

Pulling the pull switch once will send the motor towards either the upper or lower limit position. The direction alternates each time the motor is activated by the pull switch. To stop the motor, simply pull the pull switch while the motor is running.

To position the roller shade to the favourite position, pull and hold the pull switch for 3 seconds, upon which the motor will then move the roller shade to the favourite position.

Installing the Solar Panel

The Dendo solar panel is a useful accessory that can extend the time interval between recharging the motor. In some cases it could even eliminate the need to recharge the motor altogether.

Preparation​

Select a location on the window pane where the solar panel is to be attached and clean the area of any dust. This will ensure the adhesive strip works as intended.

A flathead screwdriver is needed to release the motor I/O cover.

Steps​

  1. Plug solar panel cable into the solar panel.
  2. Remove the backing from the adhesive strip on the solar panel and stick the solar panel to the cleaned area of the window pane.
  3. Use a flathead screwdriver to pry the I/O cover off the bottom of the motor.
  4. Pull out the solar panel reciprocal connector from inside the motor head.
  5. Put the I/O cover back onto the motor.
  6. Plug the solar panel cable into the reciprocal connector.
  7. Use the included cable clips to tidy up the cable.
 Important

Take care to install the solar panel at a location that is close enough for the cable can reach the motor.


 Two cable exits

The solar panel reciprocal connector can exit the motor head on either side. Choose the one that works best for your installation.

Â